Contents
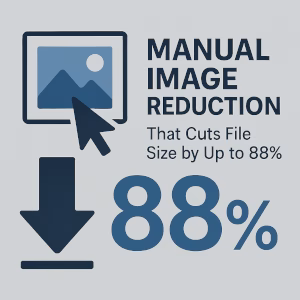
- 1 Manual Image Reduction That Cuts File Size by Up to 88%
(Without Destroying Quality)
- 1.1 Why Most Image Compression Fails
- 1.2 What Makes My Manual Image File Size Reduction Different
- 1.3 The Core Principles Behind the Method
- 1.4 Step-by-Step: How the Manual Image File Size Reduction Process Works
- 1.4.1 Step 1: Strip Everything That Doesn’t Affect Visual Output
- 1.4.2 Step 2: Normalize Dimensions to Real Display Size (Not “Maybe” Size)
- 1.4.3 Step 3: Rebuild Color Depth Instead of Keeping Defaults
- 1.4.4 Step 4: Choose the Right Format for the Content (Not the Tool)
- 1.4.5 Step 5: Manual Compression Tuning Instead of Presets
- 1.4.6 Step 6: Visual Validation at Real Display Size
- 1.4.7 Step 7: Final Export with Zero Overhead
- 1.5 Why This Method Reaches 88% Reduction (When Tools Don’t)
- 1.6 What This Method Is Not
- 1.7 Common Objections — Straight Answers
- 1.8 The Bottom Line
Manual Image Reduction That Cuts File Size by Up to 88%
(Without Destroying Quality)
Most image optimization tools promise big savings. Few actually deliver them without wrecking image quality, blurring text, or introducing ugly artifacts.
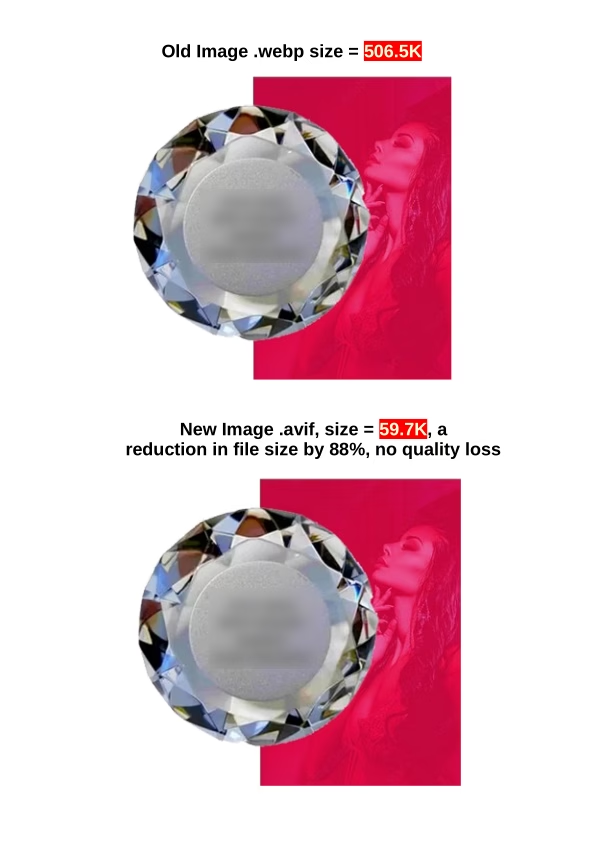
My manual image reduction method routinely achieves 70–88% file size reduction — not by blindly compressing images, but by rebuilding them correctly from the pixel level up. This isn’t automated, and it’s not a plugin toggle. It’s a controlled, technical process designed for speed, SEO, and visual integrity.

If you care about performance, rankings, Core Web Vitals, and user experience, this is what serious image optimization actually looks like.
Why Most Image Compression Fails
Let’s be honest:
Most “image optimization” is lazy.
Tools usually:
— Recompress already bloated images.
— Leave unnecessary color depth.
— Preserve useless metadata.
— Keep oversized dimensions.
— Use poor quality export settings.
— Guess instead of measure.
The result?
You get maybe 20–40% smaller image file size at best — often with visible degradation — and you’re told that’s “optimized.”
It isn’t.
Real optimization means:
— Correcting what should never have been there in the first place.
— Reducing data, not just squeezing it harder.
— Matching image structure to its actual display context.
That’s where my method differs.
What Makes My Manual Image File Size Reduction Different
This is not:
— A plugin.
— A batch script.
— A preset.
— A bulk compression tool.
This is a manual, controlled, image-by-image process that focuses on removing structural waste — not just compressing pixels.
Each image is treated as a unique asset with:
— Its own display context.
— Its own content type.
— Its own optimal format, bit depth, and compression strategy.
That’s how reductions of 70–88% become normal — not exceptional.
The Core Principles Behind the Method
Everything I do follows these principles:
— No unnecessary pixels
If a pixel is never displayed, it doesn’t belong in the file.
— No unnecessary data
If metadata, profiles, or channels serve no visual purpose, they’re removed.
— No unnecessary color depth
If the image doesn’t visually require 24-bit color, it won’t keep it.
— No unnecessary format overhead
Each image gets the format that delivers the smallest file size for that exact content.
— No quality loss that humans can detect
Compression is pushed to the threshold of invisibility — and not beyond it.
— Every export is validated visually
No “looks fine on my machine” shortcuts.
Step-by-Step: How the Manual Image File Size Reduction Process Works
This is the actual workflow. No vague promises. No buzzwords.
Step 1: Strip Everything That Doesn’t Affect Visual Output
Most images carry:
— EXIF data
— Camera profiles
— ICC color profiles
— Software tags
— GPS data
— Thumbnail previews
All of that adds weight.
None of it improves how the image renders on the web.
I remove 100% of non-visual metadata — always.
This alone can shave:
— 5–15% off JPEGs
— 10–25% off PNGs
— More on photos from cameras or design tools
Step 2: Normalize Dimensions to Real Display Size (Not “Maybe” Size)
Most websites upload images far larger than they’re ever displayed:
— 4000px wide hero images rendered at 1200px.
— Thumbnails uploaded at full resolution.
— Retina-ready images without serving retina markup.
I resize images to the exact maximum display size they will ever be rendered at — not a guess, not a “just in case” size.
This step alone often produces:
— 40–70% reduction on its own.
— Without touching compression at all.
No reason to ship pixels the browser will never display.
Step 3: Rebuild Color Depth Instead of Keeping Defaults
Most tools export:
— JPEGs at 24-bit color by default.
— PNGs at full RGBA even when transparency isn’t needed.
— WebP/AVIF at unnecessarily high bit depths.
That’s waste.
I analyze:
— Color range
— Gradients
— Flat areas
— Text overlays
— UI elements
— Photographic noise
Then I:
— Reduce bit depth where visually safe.
— Use indexed color where appropriate.
— Eliminate alpha channels where not needed.
This can remove another:
— 10–30% of file size.
No visual change. Just fewer bits.
Step 4: Choose the Right Format for the Content (Not the Tool)
Not all images belong in AVIF.
Not all images belong in WebP.
Not all images belong in JPEG.
Each format has strengths and weaknesses:
— AVIF: Incredible compression, slower encode, best for photos with complex detail.
— WebP: Good balance, great for transparency, solid browser support.
— JPEG: Still useful for legacy compatibility and fast decoding.
— PNG: Only for UI elements or when true lossless is required — which is rarely.
I choose the format based on:
— Image content type.
— Compression tolerance.
— Rendering speed.
— Browser support requirements.
— Visual complexity.
Step 5: Manual Compression Tuning Instead of Presets
Compression presets are lazy.
Manual tuning is precise.
For each image, I:
— Adjust quantization tables.
— Tune chroma subsampling.
— Control entropy coding.
— Balance luminance vs chrominance retention.
— Push compression until just before visual artifacts appear.
— Then I back off slightly.
This is how:
— JPEGs drop to 20–30% of original size.
— WebPs drop to 15–25%.
— AVIFs drop to 8–20%.
Without visible degradation.
Step 6: Visual Validation at Real Display Size
Every optimized image is:
— Viewed at 100%.
— Viewed at intended display size.
— Viewed on light and dark backgrounds.
— Checked for:
— Banding
— Haloing
— Color shift
— Text blur
— Gradient collapse
— Compression artifacts
If anything looks off, it gets reprocessed — no exceptions.
Speed is useless if your site looks cheap.
Step 7: Final Export with Zero Overhead
Final files are:
— Stripped.
— Correctly sized.
— Correct format.
— Correct color depth.
— Correct compression.
— No redundant headers.
— No unnecessary chunks.
This is where the last few percentage points are shaved off.
Why This Method Reaches 88% Reduction (When Tools Don’t)
Tools mostly compress.
I rebuild.
That’s the difference.
Most tools:
— Start with a bloated image.
— Compress it harder.
— Hope quality survives.
I start by:
— Removing structural waste.
— Reducing dimensions.
— Reducing color depth.
— Removing metadata.
— Choosing optimal format.
— Then compressing.
Compression is the final step — not the first.
That’s why:
— 70% reduction is common.
— 80%+ happens often.
— 88% is achievable on many assets.
Real-World Results (What This Actually Does for Your Site)
When images drop by 70–88%, you get:
🚀 Faster Load Times
— LCP improves.
— CLS stabilizes.
— TTFB feels faster due to smaller payloads.
— Page speed scores increase.
📈 Better Rankings
— Faster pages rank better.
— Image-heavy pages stop dragging down SEO.
— Core Web Vitals move into “good” territory.
💰 Higher Conversions
— Faster sites convert better.
— Users don’t bounce while waiting for images.
— Mobile experience improves dramatically.
🧠 Lower Server Load
— Less bandwidth.
— Lower CPU usage.
— Faster cache delivery.
— Cheaper hosting costs over time.
What This Method Is Not
Let’s be clear:
❌ It’s not a plugin.
❌ It’s not bulk automation.
❌ It’s not “optimize on upload and forget.”
❌ It’s not “good enough.”
It’s:
✔ Manual.
✔ Precision-based.
✔ Visual-first.
✔ Performance-driven.
✔ SEO-focused.
If you want average results, use average tools.
If you want maximum reduction without quality loss, this is how it’s done.
When This Method Matters Most
This approach delivers the biggest wins when:
Common Objections — Straight Answers
“Can’t a plugin do this automatically?”
No. Plugins compress. They don’t rebuild image structure or analyze visual tolerance. They also apply one-size-fits-all logic. That’s not optimization — that’s compromise.
“Does this affect image quality?”
Not visibly. Compression is pushed only to the point where artifacts remain invisible to the human eye. If you can see degradation, it’s rejected.
“Is this lossless?”
Technically, no — but visually, yes. The goal is perceptual losslessness, which is what actually matters on the web.
“Is this overkill?”
If you care about speed, SEO, and conversions, no. If you don’t, then yes — and your competitors will outrank you.
The Bottom Line
If your images are:
— Heavy
— Bloated
— Slowing down your site
— Hurting your rankings
— Killing mobile performance
You need real optimization — not compression theater.
This manual image file size reduction method cuts up to 88% of file size without sacrificing quality because it removes what never belonged there in the first place.