
Delicious recipes, fashion ideas, and DIY projects can all be found and shared on the great network known as Pinterest. Uploading a pin, which enables you to share your own content or save content you find interesting, is one of the core functions of Pinterest. You will be guided step-by-step through the process of uploading a pin to Pinterest.
1: Sign In to Your Pinterest Account
You’ll need to log into your Pinterest account if you haven’t already. By going to the Pinterest website (www.pinterest.com) and inputting your login information, you can do this.
2: Access Your Profile
Click on your name or profile image in the top-right corner of the Pinterest site once you’ve logged in. You will then be sent to your profile page.
3: Click on the “+” Sign or from top-left select “Create Pin”
To find the red “+” sign, check for it on your profile page. It often sits in the upper-right portion of your screen. To start the pin upload procedure, click on it. Alternatively, you may click on the top-left menu option “Create Pin”.
4: Choose an Image or Video
You can post videos and images as pins on Pinterest. Depending on the kind of content you wish to submit, select “Choose image” or “Choose video” by clicking on the appropriate link on the left section as illustrated below. Your device’s file browser will launch as a result. I recommend you always choose videos rather than images, as videos tend to convert better.
5: Select Your File
Locate the picture or video you wish to upload by searching your computer or mobile device. Click the file to choose it once you’ve located it.
6: Add a Title and Description
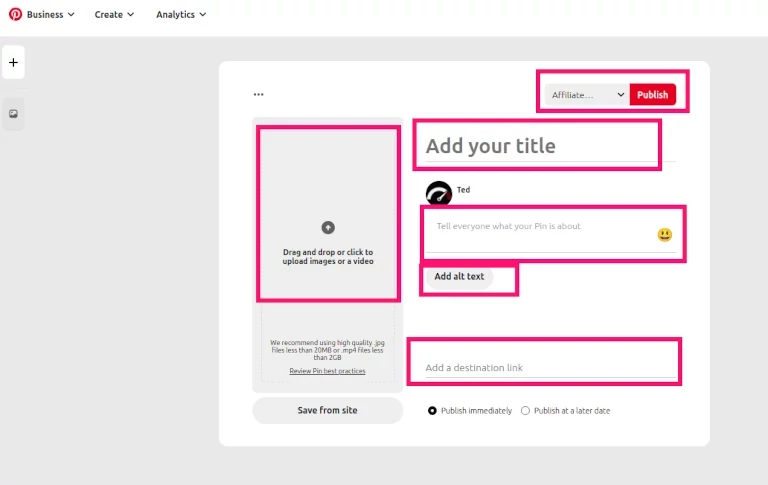
You’ll next be asked to give your pin a title and a description. The title is important as it will be used in Pinterest search results to find your pin. That’s the field containing the smiling emoji. This is a crucial step since it clarifies to consumers what your pin is all about. To increase the discoverability of your pin, be succinct and detailed while utilizing pertinent keywords. Don’t forget to add an ALT text, which is the equivalent of an image ALT text in SEO.
7: Choose a Board
The Pinterest board that you wish to save your pin to should be selected (a drop-down on the top-right of the pin window next to the Publish button. By selecting the “Create board” option, you can start a new board if you don’t already have one that’s pertinent. Think of the board as the category or the folder that’s relevant to your pin’s theme.
8: Add a Destination Link
Very important step. This is the field that will give you a backlink, and it will send traffic to your pages or offers. Just add the URL in the “Add destination link” field (found at the bottom in the image above).
9. Add Tags (optional step)
You can add tags to your pin to increase its discoverability. Tags are words that connect to the information in your pin. Just enter pertinent terms in the “Add tags” field. Pinterest will pull some suggestions based on what you type.
10: Set Privacy and Publish
You can change the privacy options before publishing your pin. You have the option to share your pin with a particular set of people immediately, keep it private, or publish it at a later date (i.e. one day before your campaign starts). Click on the red “Publish” button once you’re good to go.
11: Share Your Pin
You have been successful in adding a pin to Pinterest. You can either continue exploring and interacting with the Pinterest community or share your pin on other social networking sites (like a link wheel).
It’s simple to upload a pin to Pinterest, where you may showcase your creativity and find fresh concepts. Pinterest offers a platform (463 million monthly active users) to accomplish just that, whether you’re a blogger, a business owner, or just someone trying to collect your own inspiration.
I Do Pinteresting Marketing for You
Get more traffic
push your products
build followers and increase sales